Customizing a label template
2026-07-03
Source:vignettes/customizing_a_label_template.Rmd
customizing_a_label_template.RmdOverview
Obviously, everyone wants to be able to customize their label
templates! Why go through the bother of installing and running
BarnebyLives if you cannot do that. So here are a couple
examples of tweaking around with one of the default skeletons to get
some labels which may be better suited to an institutions style.
Note that the labels are made using LaTeX, an awesome guide for LaTeX (relevant to the level you will be using it at) is Overleaf.org, and check the links in the side bar too!
Modifications
library(BarnebyLives)
library(tidyverse)

local <- file.path('~', 'Documents', 'assoRted', 'Barneby_Lives_dev', 'LabelStyles')

l.nevadense <- collection_examples |>
  filter(Collection_number == 2823)

write.csv(l.nevadense, file.path(local, 'SoS-ExampleCollection.csv'))
As a reminder labels can be copied from their original locations, in the package installation, using the following code.
p2lib <- file.path(
  system.file(package = 'BarnebyLives'),
  'rmarkdown', 'templates', 'labels', 'skeleton'
  )

# here we copy over one of the skeletons which we are going to modify in this example
file.copy(
  from = file.path(p2lib, 'SoS-skeleton.Rmd'),
  to = file.path(local, 'SoS-skeleton.Rmd')
  )

rm(p2lib)
When using the program you will need to copy a template from it’s location within the package to a ‘local’ location. This is because you will always need to modify a small part of the skeleton which defines where the document should look for your data it will put on the labels, see the ‘creating_labels’ vignette for details. Any changes you make to the skeletons in the package directory will be lost anytime you update the package. Once the file is in that location it can easily be opened for safe editing.
By ‘local’ I basically mean put the file in a location on your
computer which will not be overwritten when you update the
package.
Obviously it’s good to try and place all of these skeletons in the same
location so you don’t have to do much hunting around to find them.
While I am about to be very busy for the next few years I am happy to
accept pull requests so that BL has a greater variety of herbarium
templates, likewise you can make your own writer_* type
functions and push those to the package. If you have questions about how
to do this, many good github resources/guides exist, and I am happy to
try and help with incorporating materials.
One final note is that LaTeX uses spaces, or ’ ’ for controlling content. In particular two spaces will force the text onto a new line. It is hard for me illustrate these in the examples, but I’ll try and do my best to mention them when relevant.
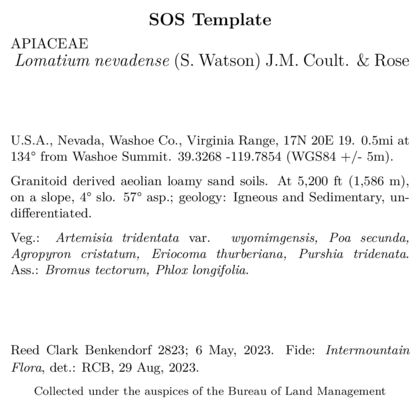
For this example we will focus on the final default template, which is a pretty middle of the road design.
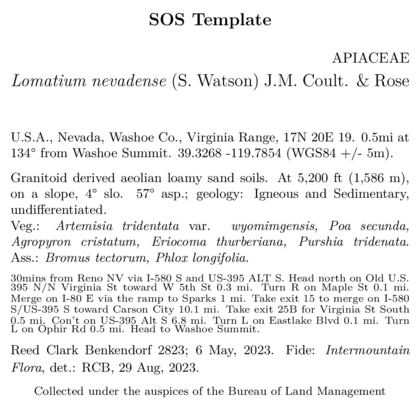
Hmm that’s a busy label, we could try and reduce the directions manually… Or, we can just rid of them! Around line 50 in the skeleton we can just remove the following details.
\begingroup
\begin{spacing}{0.02}
{\scriptsize `r record[['Directions_BL']]`}
\end{spacing}
\endgroup
Delete this!
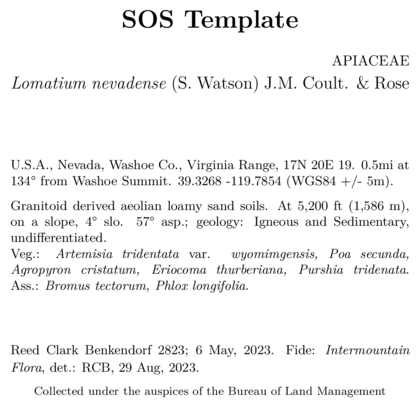
This label without directions looks better! But now that we have more
space available to work with I now want to open up some space between
the habitat notes and vegetation information. Doing that is simple, all
we need is to empty a blank line into the document between
writer(data$habitat) and data$physical_environ
blocks. Below is a reprodcution of the document as it looks.
\begingroup
\small
`r record[['Gen']]`. `r writer(record[['Site']])` `r record[['latitude_dd']]` `r record[['longitude_dd']]` (`r record[['Datum']]` `r writer(record[['Coordinate_uncertainty']])`).

`r writer(record$Habitat)`. `r record[['physical_environ']]`
Veg.: `r species_font(record[['Vegetation']])` `r associates_writer(record[['Associates']])`
`r writer(record[['Notes']])`
\endgroup
And below is the skeleton with the line inserted.
\begingroup
\small
`r record[['Gen']]`. `r writer(record[['Site']])` `r record[['latitude_dd']]` `r record[['longitude_dd']]` (`r record[['Datum']]` `r writer(record[['Coordinate_uncertainty']])`).


`r writer(record$Habitat)`. `r record[['physical_environ']]`
## line is here
Veg.: `r species_font(record[['Vegetation']])` `r associates_writer(record[['Associates']])`
`r writer(record[['Notes']])`
\endgroup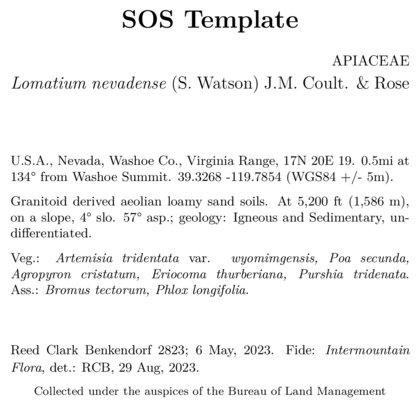
Which results in the label above, with a new space
All I want is to breathe - I’m too thin Won’t you breathe with me?
Find a little space, so we can move in-between - in-between it
And keep one step ahead, of yourself.
Now let’s change the line that controls the size of the font for
the project name. Here we will be making the font size smaller by
shifting from the LARGE to the large TeX
arguments.
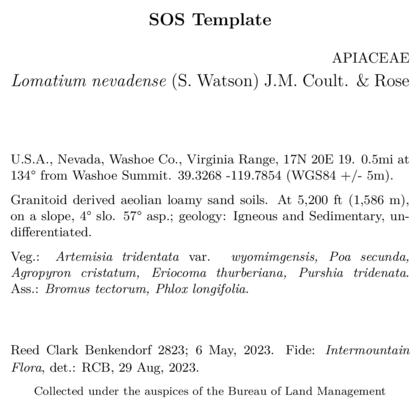
Now let’s change the location of the family on the label (which is currently right aligned), to a left alignment.
\begin{center}
\textbf{\LARGE `r record[['Project_name']]`}
\end{center}
\vspace{-\baselineskip}
\begin{flushright} # gonna change this.
\uppercase{`r record[['Family']]`}
\end{flushright} # and this
\vspace{-\baselineskip}
\begingroup
If you remove the flushright commands this part of you
skeleton will look this this:
\begin{center}
\textbf{\LARGE `r record[['Project_name']]`}
\end{center}
\vspace{-\baselineskip}
\uppercase{`r record[['Family']]`}
\vspace{-\baselineskip}
\begingroup
The image below shows a label where the family name has been moved from right to left alignment.
We may also decide that we want to put determination information
right under the species information. We can do that by just moving these
elements around. (Be sure to delete the call to writer_fide
from the chunk located all the way near the bottom of the skeleton so
that the identification information isn’t rendered twice!).
So copy the writer_fide(data) from down near the bottom
of the skeleton:
And bring it up to where the scientific name is printed. We will also make the text smaller.
\begingroup
\large
`r writer(paste(record[['Genus']], record[['Epithet']]), italics = TRUE)` ...
\normalsize
`r writer_fide(record)`
\endgroup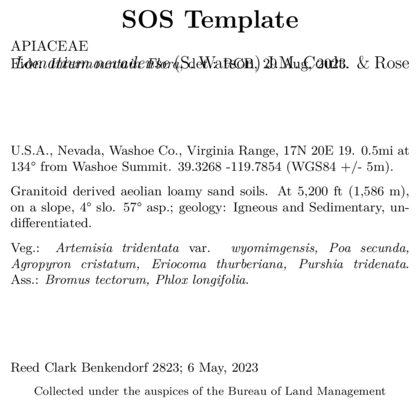
Obviously, the way I enter data for determination would be bad for this! Using my initials after my full name makes sense, in this context, who the hell is “RCB” you would wonder?
In summary
Just bear in mind you can make big changes to labels with small steps! The overleaf guide has https://www.overleaf.com/learn everything you need, and you’ll probably realize this pales in comparison.