Overview
In this vignette we will replace the default LaTeX fonts with add-on
fonts using the fontspec package, an illustrated
guide of it’s fonts is available here.
Also note that previously you may have been able to scrape by
using any old LaTeX installation, at this point you will definitely need
to make sure you have either XelaTex for lualatext installed. ‘tinytex’
which is installable directly from R should accomplish this on all
operating systems.
This vignette assumes you were able to get through
Custom Label Templates.
install.packages("tinytex")
tinytex::install_tinytex()
You can check that you have successfully installed this with
tinytex::is_tinytex()linux users
If you are on linux for the sake of compatibility for this vignette, please install some of the Windows fonts. It seems most of these are available on Mac - but if you start hitting errors, maybe give this a go.
You can do this with the code below, which will give part of your soul to Bill Gates of yesteryear.
echo "ttf-mscorefonts-installer msttcorefonts/accepted-mscorefonts-eula select true" | sudo debconf-set-selections
sudo apt install -y ttf-mscorefonts-installer
or you can
and then click tab and enter on your
keyboard when the debconf pops up to accept that you are giving Bill
Gates your soul.
and doubly verify the Tex install can access them
You may get messages about loops, these are fine as long as the last line reads something like
fc-cache: succeeded
Prepare workspace
library(BarnebyLives)
library(tidyverse)

local <- file.path(
  '~', 'Documents', 'assoRted', 'Barneby_Lives_dev', 'LabelStyles')

l.nevadense <- collection_examples |>
  filter(Collection_number == 2823) |>
  mutate(
    Project_name = 'Custom Fonts',
    Coordinate_uncertainty = '5m'
    )

write.csv(
  l.nevadense,
  file.path(local, 'SoS-ExampleCollection.csv'),
  row.names = F)
Be sure that you have copied the relevant skeleton to a local directory for use.
p2lib <- file.path(
system.file(package = 'BarnebyLives'),
'rmarkdown', 'templates', 'labels', 'skeleton'
)
# here we copy over one of the skeletons which we are going to modify in this example
file.copy(
from = file.path(p2lib, 'skeleton-customfont.Rmd'),
to = file.path(local, 'skeleton-customfont.Rmd')
)
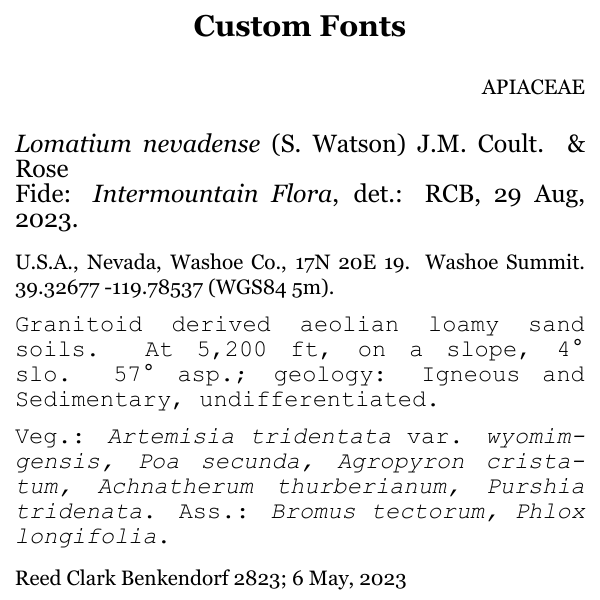
rm(p2lib)Use a single custom font
Here we will use a custom font that ships with fontspec.
If you look at the header of the skeleton-customfont.Rmd
file, you’ll notice it has more going on than the other skeletons. In
particular it has more header-includes calls. We just want
to point this out as you will likely want to merge the components of
different label templates together.
output:
  pdf_document:
    latex_engine: xelatex # or lualatex
    keep_text: true
params:
  Collection_number: Collection_number
geometry: paperheight=4in,paperwidth=4in,margin=0.1in
header-includes:
  - \pagenumbering{gobble}
  - \usepackage{setspace}
  - \usepackage{fontspec}
  - \setmainfont{Georgia}
Notice that the last two lines in this excerpt of the header
- \usepackage{fontspec} and
- \setmainfont{Georgia} are required to use a custom
font.
Note that the last line in the preamble is: this is the command
setmainfont and we are specifying that our mainfont should
be changed to ‘Georgia’.
Examples with Common Fonts
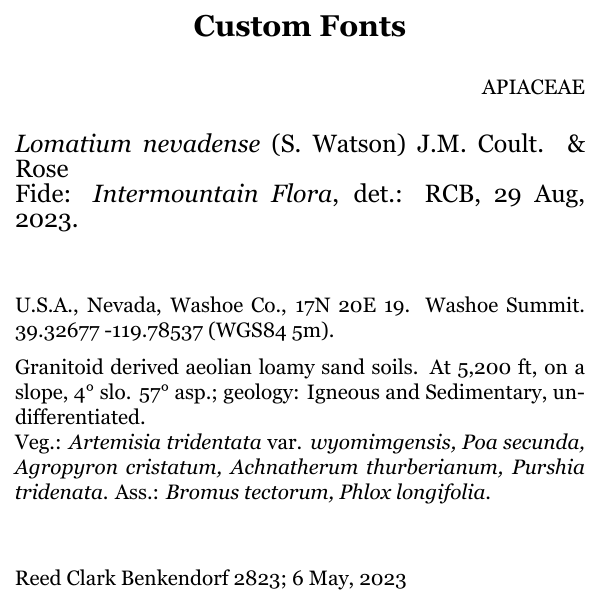
However, we can use multiple fonts (…if so desired… ) by importing an
additional font, and specifying where we should use it. Note that in our
header (again more truncated to highlight the parameters we need to
modify) we are also now calling
\newfontfamily\couriernew{Courier New} which loads and, I
believe, aliases the font.
output:
  ...
header-includes:
  ...
  - \usepackage{fontspec}
  - \setmainfont{Georgia}
  - \newfontfamily\couriernew{Courier New}
Once you have the loaded the font via specification in the YAML
header, you can specify where it is used using the
\textcouriernew{...} command anywhere in the labels
skeleton.
...
\textcouriernew{`r writer(data[['Habitat']])`. `r data[['physical_environ']]`}
Veg.: `r species_font(record[['Vegetation']])` `r associates_writer(record[['Associates']])`
`r writer(record[['Notes']])`
\endgroup
...
But! Notice that this new font is applied to the whole group not just the braced contents - we can bypass this by specifying the arguments as below.
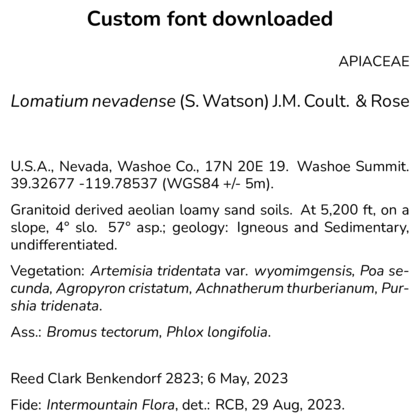
downloading fonts
Individuals may find that fontspec does not have a font to their
liking, and may want to supply a custom font. A comprehensive guide to
do this is located here.
You should be able to add downloaded fonts to the font directory on your
computer and have text find them automatically.
But in this example we will manually download from Google Fonts, and store the font in our project repository so we can load it if from a relative path - a process I think may be easier for some users. Note I normally use R to download the fonts etc., but have not tried it with a system this complex. We can download the font Nunito from [Google Fonts](https://fonts.google.com/, by following the (‘Get Font’ -> ‘Download all’) options. If you don’t want to download from google, the font is also available in this packages repository.
We then need to use a relative path in \setmainfont to
point it to the ttf files, note here we actually have to go on folder
into the downloaded font directory and include a trailing ‘/’.
...
  - \usepackage{fontspec}
  - |
    \setmainfont[
      Path = /home/sagesteppe/Documents/assoRted/Barneby_Lives_dev/LabelStyles/Nunito/static/,
      UprightFont = *-Regular,
      ItalicFont = *-Italic,
      BoldFont = *-Bold,
      BoldItalicFont = *-BoldItalic
    ]{Nunito}
---
...
Which gets us the following.